Monday, August 31, 2009

Closing down my 64-bit Ubuntu Linux experiment

This article is part of my series on exploring Linux.

Late last year I began experimenting with 64-bit Ubuntu Linux. I decided to try to use it for everything I could think of. I wrote a fair number of articles in this series detailing my experiences, problems, solutions, etc.

I went on to do other things with this Linux distro that I never got around to documenting:

  • I connected an HP flatbed scanner. The built in scanning software recognized the device and instantly scanned a document for me - awesome!
  • I was able to download torrents and burn DVDs all with the built in software - no muss, no fuss.
  • I used it to connect to my work VPN through a Cisco/Citrix solution. I have to say the user experience far exceeded what I was used to in Windows. (Part of that was the open source client not respecting host requests to disconnect me from my network printer, etc. :-D
But there have been a number of small irritants that I haven't been able to resolve yet. I suspect there are solutions to most of them, but I lack either the time or know-how:
  • Although the webcam video worked like a charm, I never did get the audio recording to work. The wrong drivers or something kept causing pops and hisses over the audio track.
  • I was never able to do anything with the handy buttons around the screen or use the handy wireless media remote. I don't know if anyone came up with drivers for those, but they sure would have been handy.
  • I never did install the drivers for the touch screen or the on-screen Wacom pen. The drivers do appear to exist, but they look cludgy and the instructions confusing.
There are other things that used to work, but which eventually stopped working. I never did anything to specifically change the settings in question, but my tinkering and many automatic system updates have exacted their toll:
  • The thing that upset me most was my video drivers. I spent a lot of time getting them just right. At some point a system update changed the video options and also the behaviour. I could no longer just dsconnect the second monitor and have the system continue working. Instead, the system would only boot to a black screen until I returned the second monitor so that I could disable it in the software. -- Problematic when you take off with the laptop for a trip :-(
  • At some point my DNS name resolution started giving me grief. It seems to look to the wrong place for resolution. I have to wait until it times out in 10 seconds before finding a better place to resolve a name. I don't know if this is a result of my VPN tinkering or some system update. Quite irritating though.
  • I also seem to have lost connectivity to my SMB shares on my Windows network. It sees the workgroup but will go no further. This is the final nail in the coffin.
I have learned a lot through my Ubuntu experiment. I have been quite impressed at how advanced this operating system is. I can respect the solid foundation the system is built on. But I am being irritated by too many little annoyances. I suspect some of these may be cause by my choice of going 64-bit. I have since learned that 64-bit is a bit early for general consumption. It would be best to wait for applications and drivers to catch up. There was really no need for me to move with my hardware of only 4GB.

It's time to wipe this system and start fresh. I'm thinking 32-bit Suse Linux....

Monday, March 9, 2009

RDP to Windows from Ubuntu

This article is part of my series on exploring Linux.

If I am to replace my desktop computer with the Ubuntu OS, I need to be able to do everything I was doing in the Windows days. As a networking guy maintaining servers, I am constantly using RDP to administer servers and lab computers remotely. This is functionality I'm not willing to live without.

I didn't need to worry. There's a product for Linux called rdesktop which includes an interface called Terminal Server Client (tsclient). It does exactly what I'm used to with RDP - with a few more options available.

The software is available via Ubuntu's package manager. I installed it by simply typing the following command from the terminal window:

sudo aptitude install rdesktop

Wow! the software looks just like the RDP I use in Microsoft land:


It works as you'd expect. I had absolutely no issues accessing Windows computers via the RDP protocol.

Thursday, March 5, 2009

Word!

This article is part of my series on exploring Linux.

Like every other IT guy on the planet, I must use a word processor to write documents. Naturally, as a Windows user, I have been using MS Word - and for the past couple of years Word 2007 with the docx file format. Let's see how I handle the transition to Open Office...

Open Office is a free, open source word processor. It is included with Ubuntu and is also available for Windows. There is no doubt - it is a full featured word processor. It had every feature I was looking for. Perhaps a publisher might need more... but maybe not.

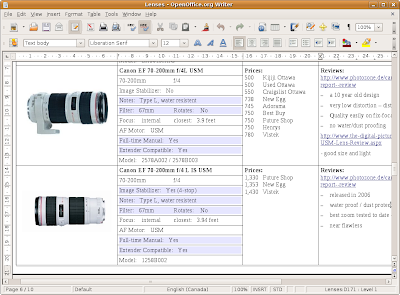
I tested it out by creating a document with a complex table (something I can get frustrated by in Windows). I included graphics, hyperlinks, custom styles, cell colouring and split cells. It did quite well:


The table formatting menu that Open Office provided put MS Word to shame!


Although the menu was a pleasure to use, there were some problems. I could easily split cells, but then they became impossible to manage. There was no way I could select a row including split cells (as shown above) to save my life. This prevented bulk formatting, copying, etc. I had to actually copy each row and then manually split cells afterward.

Now, how about compatibility with the rest of the world? This isn't as big a problem as you might imagine. For one, my children's school just switched to Open Office (this seems to be a trend) so there is obviously no problem there. For the rest of us using MS Word in the work environment, Open Office supports most common file formats - let's test it!

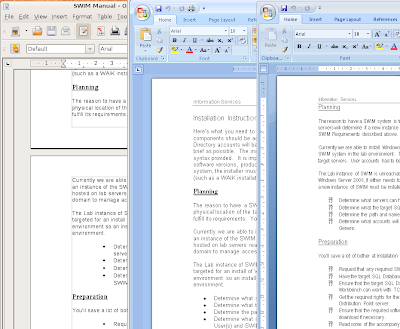
I've heard that Open Office works very well with standard MS Word .doc files, but I've been using MS Word 2007 .docx files for the last while. Despite the docx format being only a couple years old, Open Office did a very good job of converting the file. But that's the problem. Open Office converts the document into something it can understand and it doesn't do a perfect job.

I tried editing some guides I had been working on. The documents had the usual headings, table of contents, page headers, cross-references, etc. But things just weren't right. Things like my indents were not the same and the page headers were all buggered. I quickly realized that I couldn't use Open Office to edit my work documents. There was no way I could check a document out from work, edit a couple paragraphs and return it in the same condition.

(Here's an example of the results. Open Office on the left, MS Word 2007 in the middle. (I'll discuss the image on the right in a moment.))


I realized I couldn't live without MS Word 2007, but I'm still dedicated to trying to do everything in Linux. It's time to try Wine.

Wine is an extremely interesting product. It's a Linux application that creates an environment into which a Windows application can be installed and used. Many people call Wine a Windows emulator, but it really isn't. There isn't the overhead of an emulator. Wine calls itself a "translation layer". It basically provides Windows applications with the Windows services it expects to find (such as the registry) in very much the same way that Windows does it. Apparently Wine is so efficient that people are able to play first-person shooter video games within it!

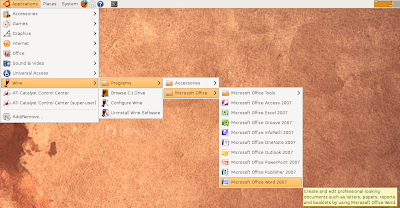
I used Wine to install and run MS Word 2007. I am now able to edit my work documents from my Linux PC and check them back into the office with no issue. Very cool! It's even quite neat how Wine integrates Windows applications with my desktop - it's almost seemless - take a look at the shortcuts:


However, as with everything, I found issues you may want to know about. Before I get to that, I'll cover how to install Wine and Word 2007.

To install wine:

It looks like my 64-bit version of Ubuntu complicated the installation of Wine a bit. I found some good instructions buried in this forum post that helped quite a bit. The first thing to do was to add a reference to a Wine repository to my system's list of APT sources for the version I am using - here's the command to enter into a Terminal window:

sudo wget http://wine.budgetdedicated.com/apt/sources.list.d/intrepid.list -O /etc/apt/sources.list.d/winehq.list

Next, I added the repository's key to my system's list of trusted APT keys:

wget -q http://wine.budgetdedicated.com/apt/387EE263.gpg -O- | sudo apt-key add -

Then I updated my package information and installed Wine:

sudo apt-get update
sudo aptitude install wine

Wine is now ready to be used to make Windows application work in Linux.

Installing an application (MS Word 2007 for instance) couldn't be easier. I just had to start the process from the Terminal window. I found the Windows commandline command for initiating an installation and just prefaced it with the word "wine" (i.e. wine setup.exe).

Because of Wine, the application's installer proceeded as I would normally expect. When it completed, I found shortcuts in the Applications menu under Wine|Programs.

I was very pleased. I then ran MS Word and opened one of my test docx files. The results are shown in that third example on the right in the earlier image above. Everything I tried in MS Word 2007 worked flawlessly. All my formatting and 'complex' document features were preserved (this is MS Word 2007 afterall). There were just two small problems...

Can you see the problems in the sample on the right as compared to the sample in the middle? For one thing I lost my bullets to some strange numbery thing. After some research I learned that the problem was with Linux/Wine not having the symbol.ttf font that Word uses to display the bullet symbol.

Luckily my machine is still licensed for Vista. I simply browsed the Vista NTFS partition for the missing font files and copied them to the folder Wine uses - in my case it was:

/home/gordon/.wine/dosdevices/c:/windows/fonts

Problem solved.

The only other very slight problem that you may have noticed from the earlier sample, is that the pagination / page formatting is out of wack. This seems to be due to a difference in the way fonts are handled - very much like when you change from one printer driver to another. This isn't a problem as long as I don't worry about the pagination at home and wait until I get to work to make sure things line up. If I don't disrupt the formatting of a document signed out from work, there are no issues at all.

As I worked with my documents, I noticed another generic Wine issue. I had troubles pasting screenshots from my Linux environment into my Word documents. It turns out that Linux and Windows handle paste buffers very differently. As a result, they don't always interact as one might hope. I had no troubles handling strings of text, but pictures were a no go. To circumvent this, I just had to save the picture as a file and then import that file into Word the usual way.

I was very impressed by what I was able to accomplish in Ubuntu regarding document editing even if it wasn't perfect. I look forward to the continued growth of Open Office both in capability and popularity. I am convinced it is the future.

Wednesday, March 4, 2009

Using the terminal (command line)

I'd like to apologize for my long delays in posting an article. I've actually got 5 articles in the works, but my Linux configuration is getting more complex. It's taking much longer for me to overcome technical hurdles...

In the mean time, I found a book I'd like to tell you about:


Linux 101 Hacks is another free online book (pdf) that was published this February. The hacks documented really don't fit my definition of what hacks are. It's more like a book of handy commandline tips, tricks and shortcuts. In my short time working with Linux, it has become quite clear how important a role the terminal plays. Anything that helps me work in that environment is most welcome.

Getting the book is a bit awkward. You need to subscribe to a blog written by the book's author. The blog's e-mail subscription will deliver a password for getting the book. A slight pain, but the blog doesn't look half bad either!

Wednesday, January 28, 2009

Ubuntu Reference Book

This article is part of my series on exploring Linux. In my last article I played with a thumb drive and a memory card reader in my laptop. I went on to learn about ejecting the devices and formatting them.

I've enjoyed writing this blog as I learn Linux and I like to think that I am helping people out there who are going through the same process. But one irritating thing about my blog and others is that it is focused on very small pieces of the Linux puzzle. It is hard to see the big picture or put a lot of the information in context.

This week I found a wonderful book that may help. Check out the Ubuntu Pocket Guide and Reference!


It provides a great overview of Ubuntu while also helping a beginner accomplish typical things like actually installing the product. It answers many questions I have and touches many of the areas I have been dealing with.

Not only is it a cheap $10 book, but you can also download it as a free PDF with the author's blessing!: http://www.ubuntupocketguide.com/download.html

Give it a read and then come back to my blog as I continue to struggle with things that don't behave as they should.

Saturday, January 24, 2009

Thanks for the memory

This article is part of my series on exploring Linux. In my last article I had fun using bluetooth to connect to my Nintendo Wiimote. Today I decided to try connecting to some memory devices. I wasn't too worried about connecting to USB thumb drives, but I was wondering if Ubuntu would make use of my memory card reader.

First up - the memory card reader! My HP tx2600 series laptop has a built in reader. I stuck in an xD memory card from my Olympus camera and instantly received this message:


Nice! A clear message that gave me clear choices. I couldn't ask for more than that. I went on to easily browse and use the memory card.

Next up - a USB thumb drive! My laptop came with a free CA Internet Security Suite (for Windows) on an autorun thumb drive. Let's see what happened when I stuck that in:


Another clear message and autorun is supported! This is much better than the behaviour in XP that either just autoruns or doesn't autorun at all depending upon previous settings. Vista also offers a similar message to this; albeit more visually confusing and with more options. It would actually be nice if Ubuntu offered to let me browse the drive like Vista does - but then again, I merely have to click elsewhere on the desktop anyway.

I really liked the way these two devices were presented in the File Browser (Ubuntu's version of Windows Explorer):


When the media has no name, the File Browser lists the device's size as a way of identifying it. Makes sense to me. At the top of the viewing pane it leaves the option to autorun the thumb drive just in case. I got the same behaviour when browsing the xD card - the option to open F-Spot was left at the top.

The thing I liked best about browsing the media devices was the eject icon next to each device. One should always eject or "safely remove" media to make sure disk caches are flushed, etc. (I don't know that this is a Linux requirement, but I imagine it is). This was an issue I've had with XP. I regularly disconnect media and have to dig down through a context menu or task bar icon to get the job done. In Ubuntu I just click the eject icon. It knows what to do differently if it is a CD, USB or memory card. No muss, no fuss - it doesn't even ask for confirmation. If you clicked eject in error, just click on the device entry that is still listed and it will automatically remount it for you. This is such a little detail, but I really liked it.

I should also mention the eject icon on my network share (called "netware" above). That icon lets me quickly unmount my network connection as well.

I did manage to find a slight hitch with my memory exploration however. Remember how my thumb drive came with an autorun of CA on it? I just wanted a blank drive. I could have just delete the files, but I decided to format the drive instead so I could remove the CA label it had. I couldn't find any way within the File Browser to format or rename the device! At first I thought that was rather dumb, but then it made sense. The only things we really needed to format regularly were floppies - when was the last time you held one of those? Maybe I should be asking why Windows still gives me the option of formatting...

So how do I format my thumb drive? Apparently there are the typical commandline methods, but I read about a graphical interface called GParted and decided to give that a try. I fell into a very typical Linux/Ubuntu routine:

  • I couldn't find a shortcut to GParted. That isn't unheard of for a GUI app - particularly an administrative type app like this.
  • I brought up a Terminal window and tried "gparted".
  • It wasn't present, but Ubuntu provided this helpful message: "The program 'gparted' is currently not installed. You can install it by typing: sudo apt-get install gparted"
  • Isn't that helpful! So I did just that. The application came tumbling in.
  • I typed "gparted" once again. This was the response:

  • Again, very helpful. GParted is treating this very much like an admin task because floppies just aren't the norm anymore. I knew how to become root. I put sudo to good use once again by typing "sudo gparted". I was rewarded with the GParted interface:

  • The graphic jumps ahead a little bit. In the graphic I have already asked to have my drive formatted as FAT32. It is just waiting for me to confirm the action.
There were actually some interesting choices from this interface:

You may notice that I am formatting the device /dev/sdc. That label was new to me. At first the only way I could tell it was my thumb drive was by the size. But there was a subtle detail a neophyte like me missed. GParted listed information about the various partitions - including its Mountpoint (/media/disk-1 in this case). This is the same information File Browser presented in the Location field at the top of the interface. Very subtle, but it is enough and from now on I'll know.

The second interesting choice was for the type of Filesystem. Rather than just FAT, FAT32 or NTFS as I am used to in Windows, I get a whole lot more in Linux! Here were my choices: EXT2, EXT3, FAT16, FAT32, Linux-Swap, ReiserFS. That is quite the selection! There were even 7 other partition types that didn't apply in this situation. (I think I'll just stick with FAT32 :-)


In the end, I'm very impressed with the way Ubuntu handled my access to my memory card and thumb drive. I'm fine with the way it handles formatting. I'm very impressed with the way the operating system held my hand through the formatting process. Let's face it, my hand was definitely held through what could be a daunting process - and all without the help of an annoying wizard!

Friday, January 23, 2009

Wiimote goodness

This article is part of my series on exploring Linux. In my last article I was pleased at how well Linux handled the docking/undocking of my laptop. My network and dual monitor settings were reconfigured optimally for each scenario.

Today I came across the blog of Matt Cutts who describes how to connect a Wiimote to a Linux PC (a Wiimote is the game controller from a Wii console). I decided to take time out and give it a try.

Long ago I was impressed by the potential of the Wiimote as a control device when I saw Johnny Chung Lee's projects. He came up with some wonderful multi-touch, whiteboard and head tracking VR applications for Windows. More recently, , made an application for the Mac that surfs Google satellite maps using a Wii balance board.

I followed Matt Cutts instructions and had my Wiimote connected in no time:

  • I got and installed the application from the terminal by typing: sudo apt-get install wminput wmgui lswm
  • I ran lswm and it returned the message: Put Wiimotes in discoverable mode now (press 1+2)...
  • lswm was able to properly detect my Wiimote when I pressed 1+2!
  • I launched the GUI with the command: wmgui and this is what I saw:


The application was able to read all the information being sent from my Wiimote and attached Nunchuck! Very cool. Now I just need to wait for people to start writing great applications that use the information - like those above that were made for the Windows and Mac environments.

BTW, here is a good articles on how to use a WiiMote in Windows: http://wiihacks.blogspot.com/2006/12/howto-use-wii-mote-in-windows-as-your.html. Here is a Windows application similar to wmgui: WiinRemote.

(Reading the Windows how-to is a very good demonstratation of the difference between the Windows and Linux world -- Half the article deals with how to overcome the limitations of the Microsoft bluetooth implementation and various licensing restructions. Those restrictions just didn't exist in Linux. Rather, in Linux the problem is a lack of people generating useful apps for the controller thus far.)


Remember my problems getting my dual-monitors to work as one seemless desktop? Well, it's been working great lately, but there are some caveats. The wmgui application triggered some of them...

When I ran wmgui, I also got the message: Xlib: extension "RANDR" missing on display ":0.0". The ATI Xinerama feature that allows me to move windows between displays seems to break the RANDR extension (xrandr). The "problem" didn't seem to affect me at all until I did a screenshot for this article. Before I ran wmgui, I could get a screenshot that included my whole desktop spread across both screens. After running wmgui and getting the error, I was only able to get a screenshot of the first monitor and the left half of the second. Not a big problem, but it bears further investigation.

I found more details here https://bugzilla.redhat.com/show_bug.cgi?id=431727 where others were troubleshooting similar problems. Part of my problem may be that xrandr screens cannot be larger than 1920x1200 but my overall desired size is 2960x1050.

Saturday, January 17, 2009

Docking / Undocking

This article is part of my series on exploring Linux. In my last article I was quite disappointed at how difficult it was to get my dual monitors configured just the way I wanted; although it sounds like a lot of the fault lay at the feet of ATI and their proprietary drivers.

My multi-phased procedure for getting a perfect monitor configuration made me doubt whether my settings would be permanent. Would my configuration survive an undocking and redocking of my laptop (my 2nd monitor going away and coming back)? It was time to test!

I decided to kill two birds with one stone and test the networking results as well. Up to this point I had been using the internal Wifi features of the laptop and ignoring the wired ethernet port on my docking station. By configuring the laptop to use the wired port, I could see what happens when I undock and leave that port behind.

Talk about another easy process! I connected the dock to the wall via RJ-45 cable - Ubuntu immediately noticed and connected to my wired network. Not only did it start to use the wired network, but it remained connected to my wireless network as well:


Interesting result. Not only does the network drop-down give a wonderful summary of my network status, it also lets me disconnect from my wireless connection if I wish.

Now that I'm using my dock's wired network connection and a desktop spread onto my dock's monitor, it's time to disconnect. I turned off the laptop and took it out of the dock. I powered it back on and everything worked perfectly! My main desktop panels had moved to the small laptop screen (normally they were on the large LCD) and Ubuntu kept my mouse from wondering off the screen realestate. Clearly the desktop occupied only one screen. The networking also worked flawlessly. I was surfing wirelessly with no configuration required.

Satisfied that the test was a success, I was eager to see what would happen once I rejoined my dock. Would the dual-head screen configuration I had worked so hard for be a distant memory? I needn't have worried. When I rejoined my dock, Ubuntu started using my two screens and wired network connection as I had configured previously. This is the kind of professional, smooth experience I expect from my operating system.

BTW, have you noticed the screenshots I've been adding to my articles? These come to you courtesy of GIMP, the graphics program bundled with Ubuntu. GIMP really puts MS Paint to shame. Have you ever seen such pretty icons?

Wednesday, January 14, 2009

Dueling with my Dual Monitors

This article is part of my series on exploring Linux. In my last article I was astounded at how easily I was able to connect to my network printers with duplex and colour printing supported.

I still haven't tried to figure out why the touch or Wacom tablet features aren't working. I also haven't tested features like the web cam or thumb scanner or card reader... It was all these extras that attracted me to this HP tx2600 series laptop as a testbed for Linux - it certainly wasn't the call of the 1280 x 800 display occupying only 12.1 inches - which reminds me...

Time to fire up the second monitor, a Samsung T220 22" 1680 x 1050 screen - I want to be comfortable when running these experiments after all. I plugged the D-sub VGA connector into the laptop. I tried a few things and got various results, none of them great. Basically, when I boot the system it thinks it has one desktop of 1440 x 900 pixels. It is mirrored on both screens. The laptop screen is forced to pan around a larger desktop, while the second monitor has vertically stretched an image and is doing the ugly "non-native" thing. What I need is a desktop that is spread across two monitors that are each displaying in their proper native resolutions.

Under SystemPreferences I did find the Screen Resolution interface. At some point it did display two boxes that could be used to specify a relative position of two monitors, but it never showed the proper resolutions and when I enabled the feature, my second monitor went black. I know I'm in the right area, but I suspect I have a driver issue. I fear I must tell Ubuntu more about my ATI Mobility Radeon HD 3200. BTW, I should mention that Linux is losing at this point. When I booted into my 64-bit Windows Vista, it came right up and supported a dual monitor configuration beautifully. (Mind you, Vista did come pre-configured, so maybe it wouldn't have worked out-of-the-box in that case either).

I was pleasantly surprised when I did a search on the ATI site. There I found 64-bit Ubuntu drivers for my card and all other supported ATI cards! They also include something called the ATI Catalyst Control Center.

At this point I was in for another pleasant Linux surprise. Before attempting to download and install the driver, I decided to read the documentation. I was instantly able to read the Adobe Acrobat pdf documents. I got no warning about a missing reader and the documents appeared almost instantly - much faster than in Windows. It turns out that an open source Document Viewer was bypassing Adobe's product and just displaying the files - neat.
The ATI drivers installed cleanly and I soon found shortcuts to the Catalyst Control Center (CCC) under my Applications menu. The application has a pleasant interface. It provided great system information and accurate information about my attached monitors. It also offers fine-tuning of color and 3D settings. But the part I was interested in was the Display Manager that lets me set my screen resolutions and relative positions. -- This part sucks!

Although CCC knew the native resolutions of my monitors, it would not give them to me. I could get different parts of the desktops on each display now, but one monitor is being forced to pan and the other is displaying in a rather low resolution. Playing with it and rebooting multiple times got me a variety of results, but never the results I was looking for. I only got relief from my frustration once I did more research on the web.

I lost hours to this research and to endless reboots of my system as I tested various solutions. I'll spare you all the details, but I'll share what I learned in the hopes that I save someone else some time. Of course, everyone has a different set of circumstances, but my combination of steps seemed to be a unique solution I had not found elsewhere.

The GUI environment is presented by something called XServer. People just simply refer to it as "X" or "XVideo". As with everything else, the desktop configuration is stored in a config file - xorg.conf in this case. Nowadays drivers/software are supposed to manage this config file for you, but it is obvious that things can go squirly and the file needs to be edited directly. Forums are constantly describing entries for this file and posting the entire text of their files in hopes of troubleshooting things. I'm not entirely convinced that xorg.conf is the only place that stores desktop config information because I was changing resolutions and seeing no changes in the file.

The ATI Catalyst Control Center (CCC) is one of the modern tools that is supposed to manage that file. It clearly didn't work properly for me however. Many forums discussed a more traditional tool called aticonfig that my driver download had also installed. This tool was far more sensible and worked more predictably, but it didn't get me all the way to my solution.

Many forums talk about using an aticonfig --initial option to reset the xorg.conf file so that you can sort of start things off from ground zero. I found I still had pollution in this file that prevented me from being successful.

The best thing I ever did was open the config file and delete all of its contents:
  1. I opened a terminal window (ApplicationsAccessoriesTerminal).
  2. I opened the file with the command: gksudo gedit /etc/X11/xorg.conf
  3. I selected everything and deleted it.
  4. I saved my changes.
I then used the aticonfig tool to reinitialize this file with values that suited me:
sudo aticonfig --initial=dual-head --screen-layout=left
(Notice that sudo command again? I learned about it while fixing my sound.)

The command told Linux to operate each monitor independently and to put my main screen to the left of my secondary (there may be some reverse logic here due to the way my monitors were detected - you may want to try "right" instead).

A quick reboot revealed dual screens but still with the wrong resolutions and some weird behaviour. By the way, rather than going through the entire reboot process, you can just restart the XServer part by hitting CTRL+ALT+Backspace.

The following command fixed a lot of the weirdness I was seeing:
sudo aticonfig --add-pairmode=1680x1050+1280x800
But I still wasn't getting my native resolution I was after. At this point I resorted to the usual Screen Resolution interface found under SystemPreferences. It only offered to configure the resolution of my external monitor - but that was what I needed and it let me choose 1680x1050! Yay! (I would have provided a screen shot, but subsequent config steps seem to prevent this interface from appearing anymore.)

There was only one problem left. My mouse could glide between my two screens but I was unable to drag application windows between them. Using the ATI CCC solved this problem. I was able to use it to enable a feature called Xinerama from Display OptionsX ConfigurationXinerama. It's hard to tell, but a grayed out square means it is selected. Xinerama is the feature that gets these applications to glide between the screens.

There. I'm done. I have the screens configured exactly as I wanted. I could tell it was possible, but it was one hell of a horribly long road to get there. I ended up using all the tools I had seen (xorg.conf, aticonfig, CCC, Screen Resolution), but at least I didn't have to manually insert specific values throughout the file.

Obviously, Vista gets a big win in this category. Ubuntu / Linux sucked when it came to my dual monitor config! But apparently this may be largely specific to the ATI drivers and software that ATI provides. It sounds like users with Nvidia graphics cards may fair quite a bit better.

Now because this blog article isn't long enough... I'm going to end with a copy of my xorg.conf file - just like all those other Linux bloggers I found. After that, I'm linking to a number of helpful forums I found in case they can be more helpful than I have been. See you soon!
Section "ServerLayout"
Identifier "aticonfig Layout"
Screen 0 "aticonfig-Screen[0]-0" 0 0
Screen "aticonfig-Screen[0]-1" LeftOf "aticonfig-Screen[0]-0"
EndSection

Section "Files"
EndSection

Section "Module"
EndSection

Section "ServerFlags"
Option "Xinerama" "on"
EndSection

Section "Monitor"
Identifier "aticonfig-Monitor[0]-0"
Option "VendorName" "ATI Proprietary Driver"
Option "ModelName" "Generic Autodetecting Monitor"
Option "DPMS" "true"
EndSection

Section "Monitor"
Identifier "aticonfig-Monitor[0]-1"
Option "VendorName" "ATI Proprietary Driver"
Option "ModelName" "Generic Autodetecting Monitor"
Option "DPMS" "true"
EndSection

Section "Device"
Identifier "aticonfig-Device[0]-0"
Driver "fglrx"
Option "PairModes" ""
BusID "PCI:1:5:0"
EndSection

Section "Device"
Identifier "aticonfig-Device[0]-1"
Driver "fglrx"
BusID "PCI:1:5:0"
Screen 1
EndSection

Section "Screen"
Identifier "aticonfig-Screen[0]-0"
Device "aticonfig-Device[0]-0"
Monitor "aticonfig-Monitor[0]-0"
DefaultDepth 24
SubSection "Display"
Viewport 0 0
Depth 24
EndSubSection
EndSection

Section "Screen"
Identifier "aticonfig-Screen[0]-1"
Device "aticonfig-Device[0]-1"
Monitor "aticonfig-Monitor[0]-1"
DefaultDepth 24
SubSection "Display"
Viewport 0 0
Depth 24
EndSubSection
EndSection

(See, no mention of my chosen resolutions.)

Helpful links:

http://wiki.cchtml.com/index.php/Configuring#Troubleshooting

http://wiki.cchtml.com/index.php/Troubleshooting

http://ubuntuforums.org/showthread.php?t=221174

http://ubuntuforums.org/showthread.php?t=301941

http://ubuntuforums.org/showthread.php?p=1773710

Sunday, January 11, 2009

Printing before writing

This article is part of my series on exploring Linux. In my last article I experienced some of the difficulties of working with a 64-bit OS when there was no Adobe Flash player available. Luckily I found Adobe's beta product that worked beautifully (and just happened to be available for Linux before Windows).

I'm realizing that as I experiment with Ubuntu, I really need to print information I discover. I should setup printing before I try things like handwriting recognition with the touch screen. But I've been dreading this test. I have fairly recent printers (an HP2605dn and HP2600n) and I wonder if there will be drivers to properly support them. To complicate things, these are colour printers - one with a duplexer. They are both acting as print servers over the LAN (one wirelessly). -- see why I'm worried?

Well, my fears were unfounded! This was the easiest setup I have ever done - easier than Vista even. Here's how it unfolded:

  • I went to System|Administration|Printing and clicked on "New".
  • The system automatically scanned and found my printers (my wireless one didn't respond until the 2nd attempt however).
  • Ubuntu recognized my printer and offered to go out and find drivers.
  • It found drivers! It clearly stated that they were provided by HP. It gave me all sorts of details so I could have trust in the driver. It told me what features were supported and what testing had been done by Ubuntu, etc.
  • It then downloaded them when I was ready, using the package manager I had encountered in the past. No visits to the printer manufacturer site! How cool is that?!
  • I was given a chance to nicely identify the printer's name, location, etc. so that I could more easily work with it in the future.
  • I was then able to investigate the printer properties. I was able to set default and sharing options. All very clear and pretty. I was able to setup my colour options and duplex printing preferences no problem at all.
  • Then it printed!
It really could not be much easier than that!

In truth, there were one or two flow issues. The screens don't hand-hold you very well when downloading the printer drivers. The progress indicator went instantly from 0% to complete. Then I was left at a screen wondering if it was finished - not realizing I needed to click a different button now. Also, the driver for the 2nd printer came in with the first, so there was no need to download it - which the system told me. But the system said I could just continue with the "next" screen but left the "next" button deactivated. It was another flow issue. I just had to cancel the download and choose to use an existing driver.

I am not unhappy with the flow issue at all, and it only lost me 10 seconds or so. But I think this printer installation demonstrated a clear difference between Windows and Linux. I know Windows would never allow a flow issue like that, but there are so many other things wrong with its installation that Linux has licked. Linux provided an end-to-end installation experience (no visiting a manufacturer site). Linux communicated clearly in detail so I knew exactly what I was configuring. At the end, I had a printer published the way I wanted, performing exactly as I expected. No surprises, no mystery. I don't know if this experience can be said about all Linux printer installations, but in my case, I was impressed.

Emboldened, it's time to configure my second monitor for dual-head display! (Actually, I've already started playing, Ubuntu isn't doing so well with this one...)